
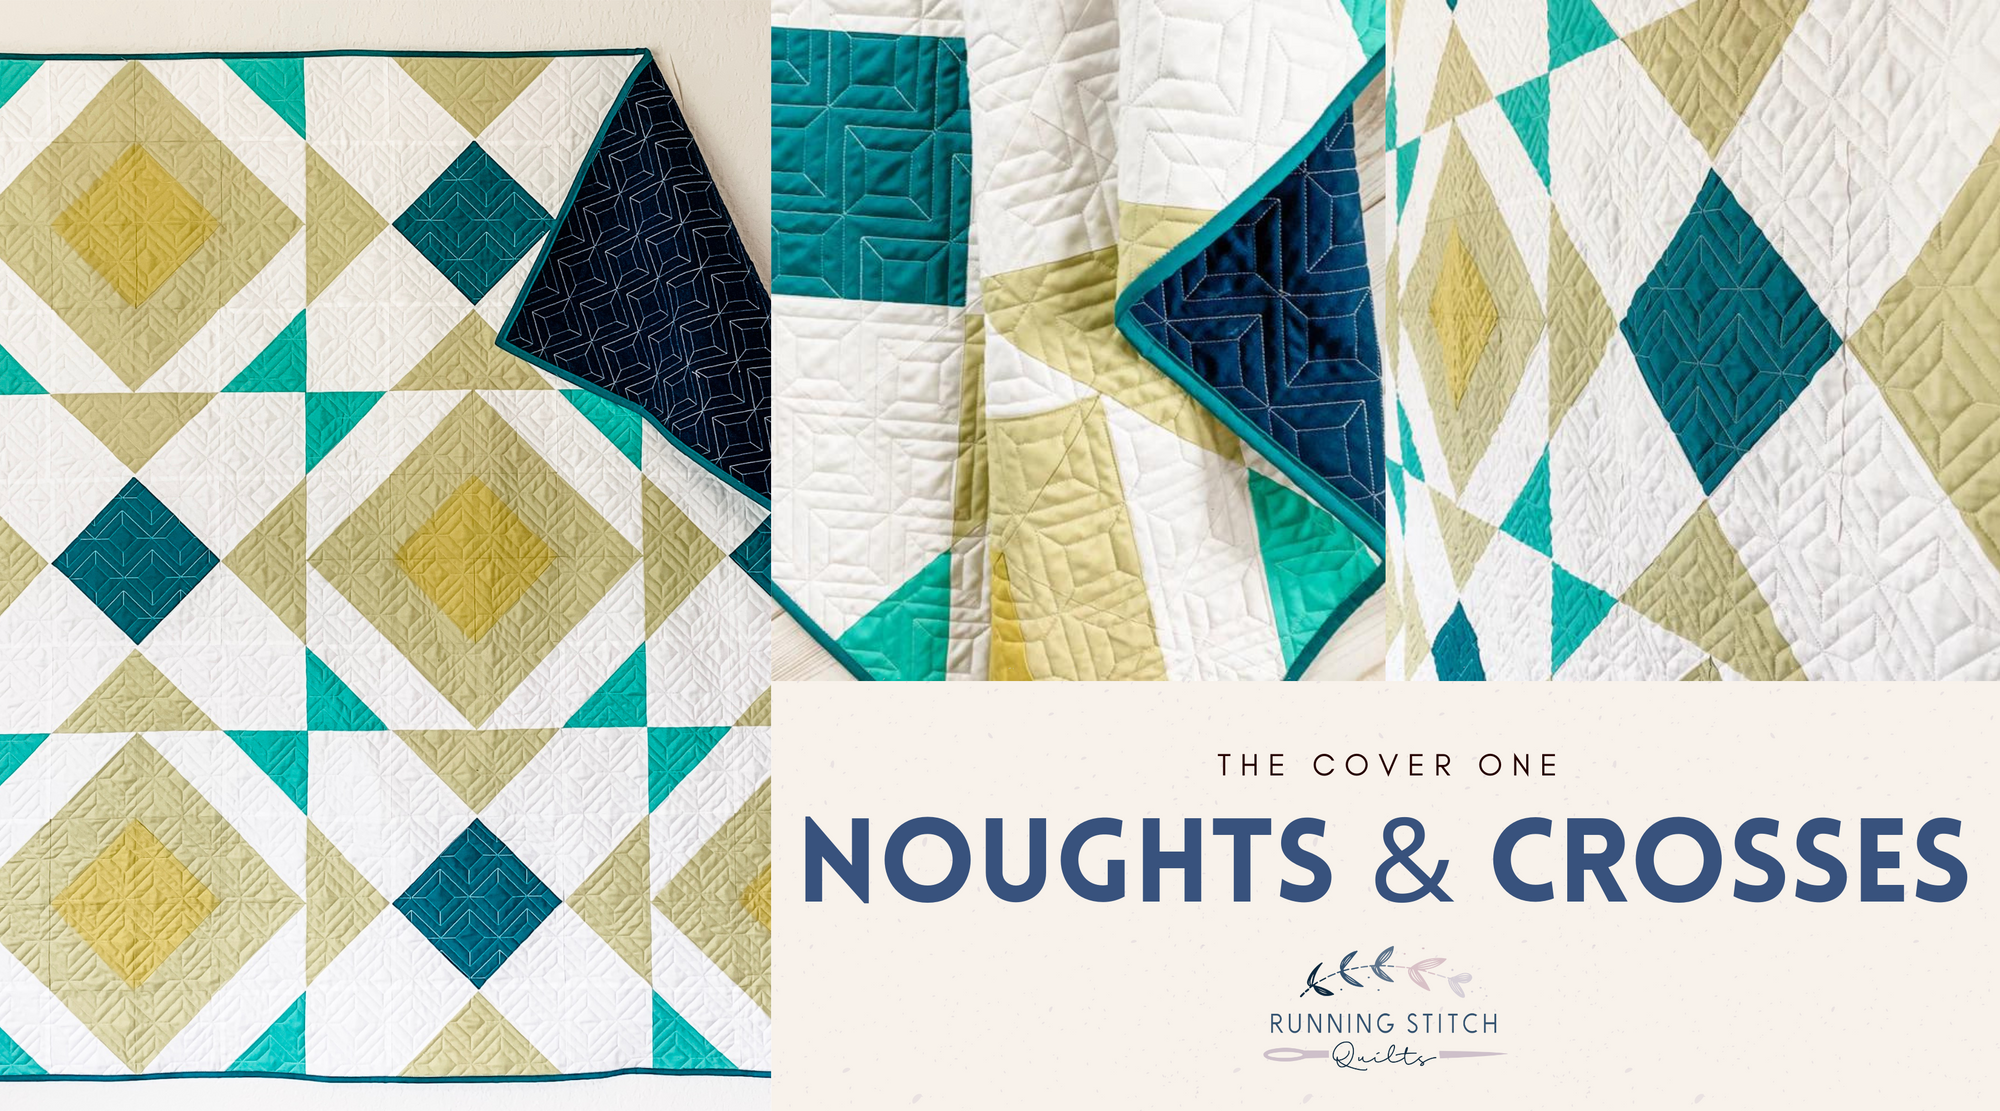
Noughts and Crosses is here!

The Noughts and Crosses pattern comes in 2 sizes: baby (36"x36") and small throw (54"x54"). It is perfect for beginners because you get to practice half square triangles, flying geese, and diamond in a square units. ;)

Naming patterns is my biggest struggle. I usually ask my husband because he is witty and clever, but he didn't have any suggestions for this one. So I took to Instagram to crowd-source a good name. One person said it reminded her of tic-tac-toe, and I thought that was fun! Then another person said it reminded her of noughts and crosses. To be honest, I had to look up what that was. It is what the English call tic-tac-toe! It was the clear winner for a pattern name!
This pattern is perfect for highlighting a fabric you LOVE by using it as the main fabric. Add in coordinating solids, and you have a stunning effect. You could also choose your favorite 4 color combination and create different effects with different color placement. Using a darker background also changes up the look of the quilt. A couple of my testers did that, and I'll share their photos on Thursday. The possibilities with this pattern are endless!
I made a sample of each size using solids. For the baby quilt, I used muted blues and grays. For the small throw quilt, I used brighter teals and yellows. I want to make a Christmas version too. Hmm...maybe I can get that done before Christmas this year...
Now for the photos. First up! The baby size.

I think this would be precious for a little boy.
I kept the quilting simple - just wavy lines spaced about an inch apart - so when it gets washed it will be soft and crinkly. Perfect for a baby.

It is only 36"x36" so it is a good size for tummy time or for keeping a kiddo warm in the stroller. One of my friends is pregnant and doesn't know what she is having. I'm secretly hoping it is a boy so I can send this to her. Shhhh. ;)
Next: the Small Throw size!

I love the brightness of the teals and yellows. The effect of the yellow was what I originally had in mind when I designed this quilt.

The quilting was done by Jill (J.Coterie Quilting) and ISNT.IT.AMAZING!?!

We worked together to pick this geometric design and I think it compliments the overall design perfectly. I have always been proud of the fact that I quilt my own quilts on my domestic machine (even it is just straight lines), but using a long-armer takes the quilt to an entirely new level. You can bet I will work with Jill again and again and again!
Seriously. It's so good!

Come back Thursday to see my testers version!
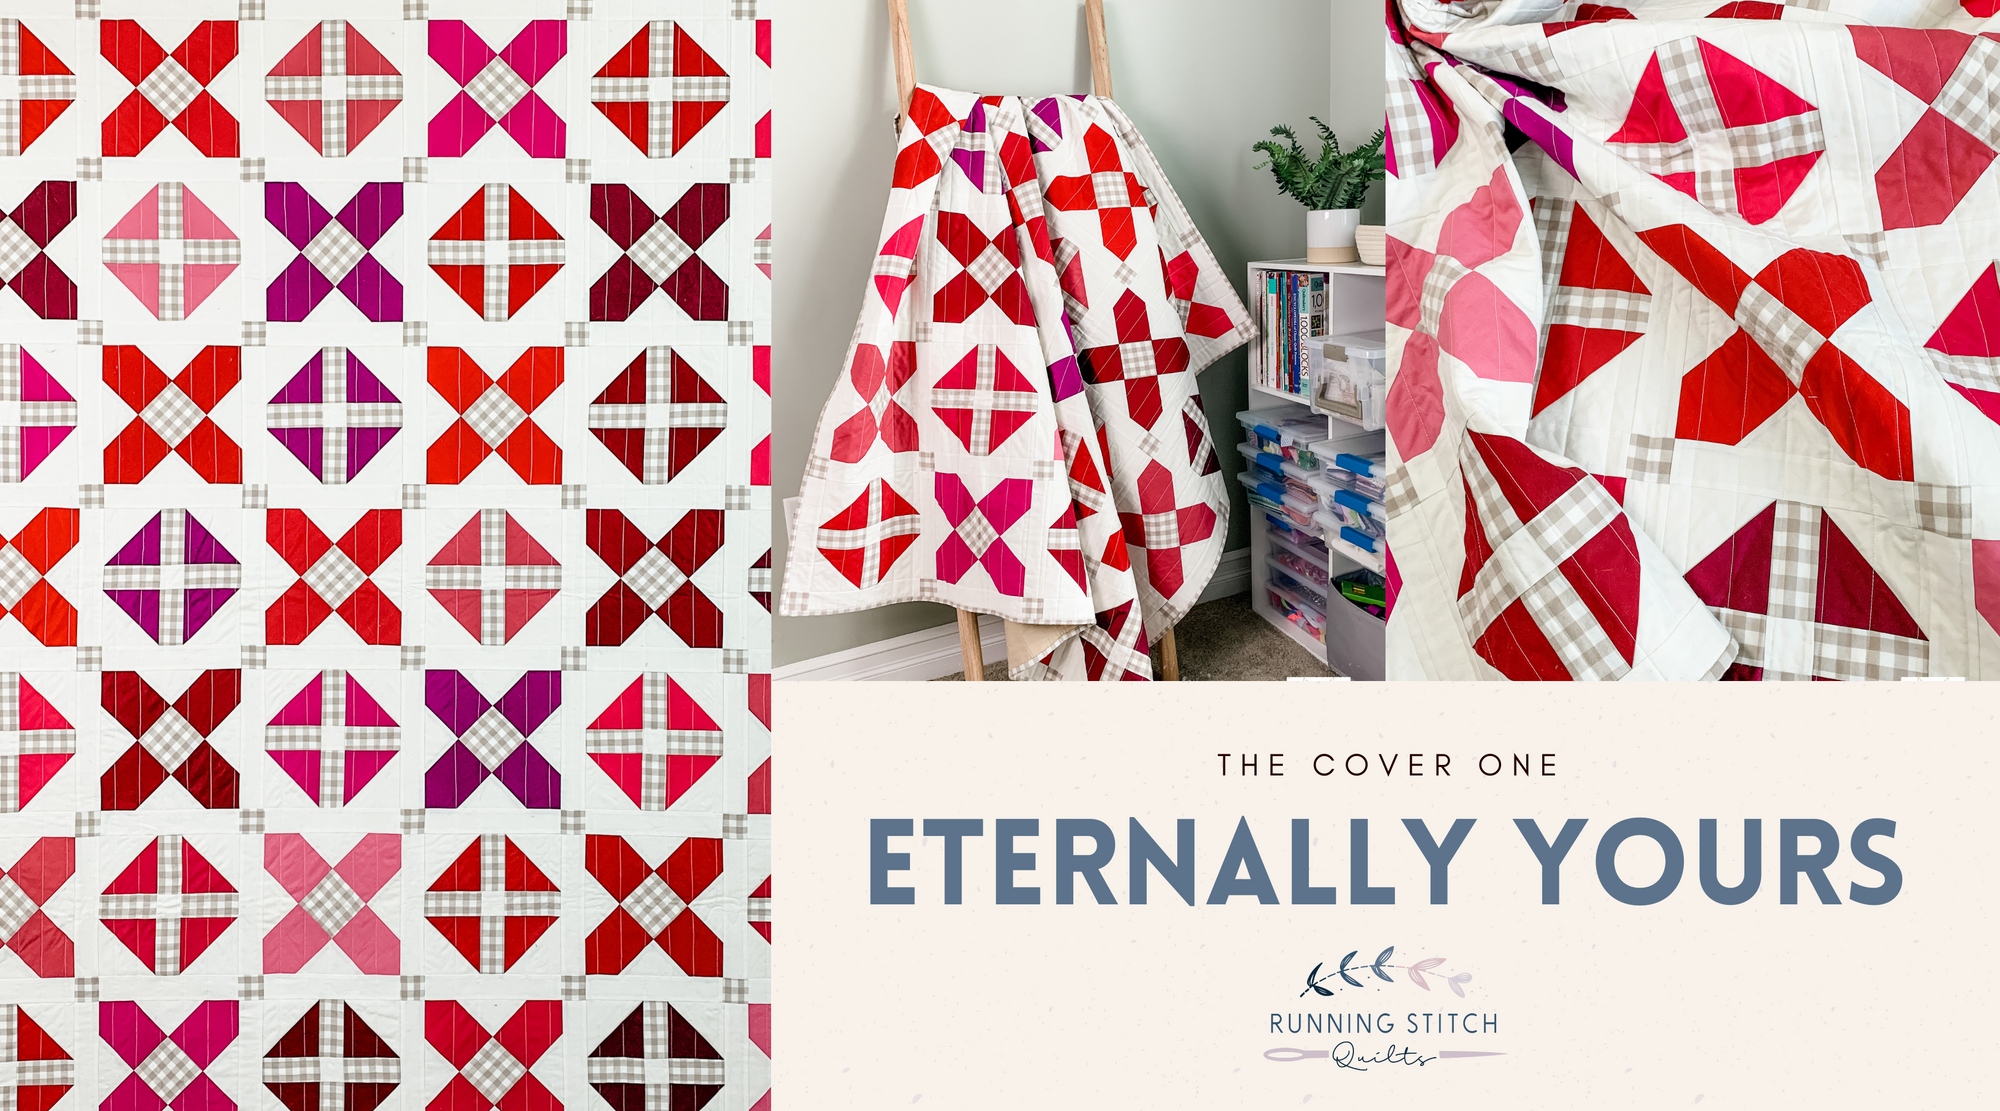
Eternally Yours in available in my shop!
While I released this pattern on Wednesday, I'm just sharing more about it now. I usually like to have this post ready to go when the pattern is available, but like all things with the pattern release, nothing went according to plan!
Right after I sent this pattern off to the testers, I found out I was pregnant! Right after I found out I was pregnant, I lost the will to do anything other than sleep. As much as I wanted to meet my original release date of Valentine's Day, I'm okay with having waited. I would rather things be done well, then quickly.

The Eternally Yours Pattern is available is three sizes: baby, throw, and bed. It has fabric requirements and layouts for two design options in each size: a minimalist, and a scrappy design. Here are some mock ups of the throw size in each of the designs.
Design 1: Minimalist - one color/fabric is used for the X's and one fabric/color is used for the O's.

Design 2: Scrappy - this option uses fat quarters, and each FQ makes 2 X's and 2 O's for a fun variety.

This quilt design actually started as a commissioned quilt I was making for a customer. I took the concept I created for her, and tweaked it to match my personal aesthetic a little better, and that is how Eternally Yours was born.
The cover quilt uses a variety of Kona Solids from Robert Kaufman. I used Blush Pink, Deep Rose, Sangria, Pomegranate, Cerise, Ruby, Rich Red, Wine, Crimson, Berry, and Garnet. The background is my go to, Kona Snow.

I quilted this one with straight line quilting about 1.5 inches apart. Straight line quilting is my favorite. It never gets old, and it looks good on everything!

And now, here are my testers versions. They did an amazing job!
Linda (@txquiltgal) made a fun scrappy throw size! I adore the fabrics she used.

Jen (@oneblessedmamaquilts) also did a scrappy throw in colors that make me excited for spring.

Mandi (@mandipersell) made a striking minimalist baby quilt. I can't get enough of the teal feature sashing she used!

April (@aprilgracequilts) made a scrappy baby size in calming, muted colors.

Jessica (@maeberrysquare) also went for the minimalist option in baby size. The pink and purple combo is a beauty!

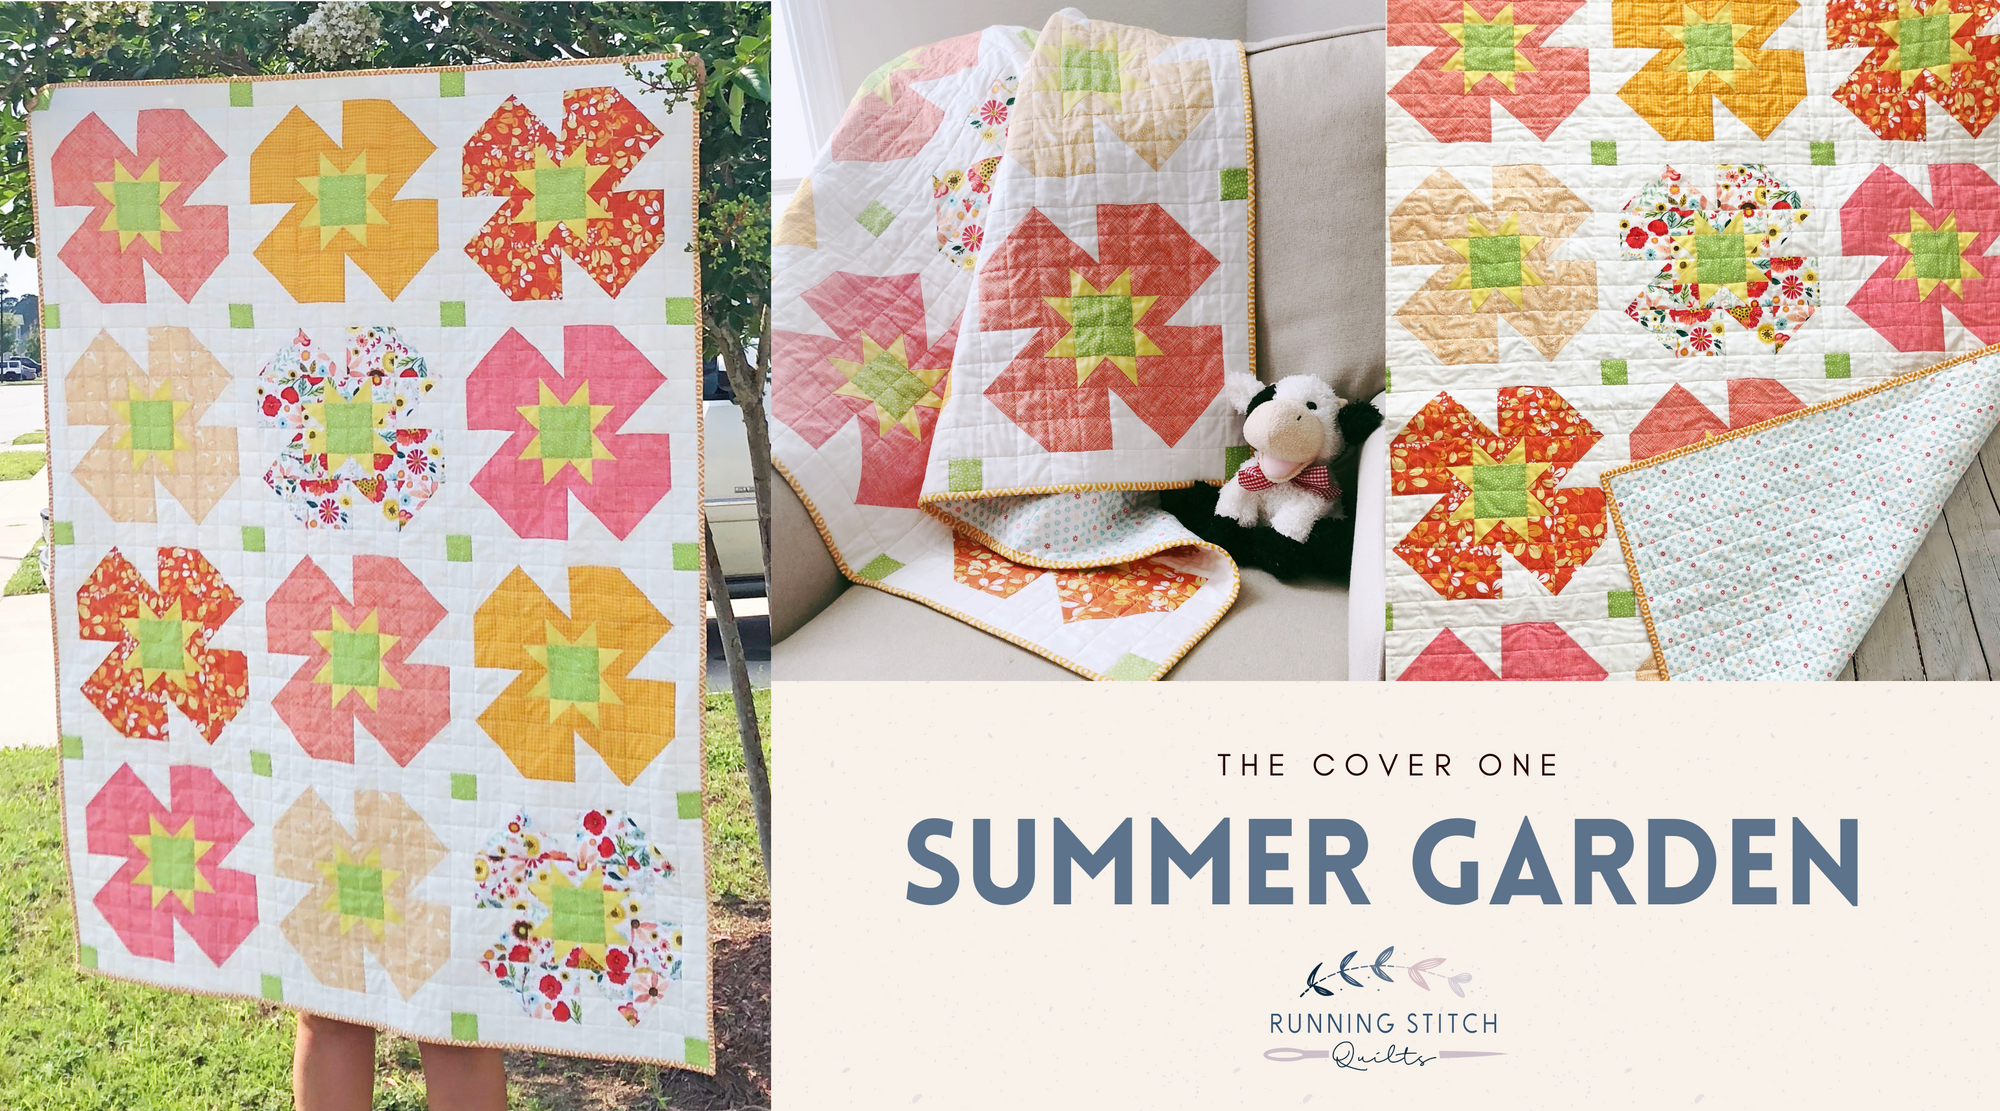
The Summer Garden Pattern is now available in my shop!

When my old college roommate asked to make a quilt for her baby girl, I started sketching out some flower ideas. I prefer traditional piecing to appliqué, so I was playing with a traditionally pieced flower with a sawtooth star center. And that's how Summer Garden Pattern was born. My friend ultimately decided to go with an appliqué pattern (see that quilt here!), and I made this one anyway because I loved it so much.
This is my most versatile pattern to date. I've written instructions for a large crib size (40" x 53") using 12" finished blocks and a throw size (56" x 74") using 16" finished blocks. Since the pattern is block based, you make any quilt size you want by choosing how many of which size block you need.
The pattern is written to get two flower blocks from one cut of fabric. The 12" finished blocks have instructions from FQ or yardage. The 16" finished blocks only have instructions from yardage, but if you wanted to use a FQ you definitely could! However, for the 16" size, a FQ will only provide enough fabric for one flower block, so you would need extra FQs depending on how big you wanted your quilt to be.

My version was made entirely from fabric I had in my stash. Some of the fabric didn't have a selvedge or didn't have identifying information on the the selvedge, so unfortunately, I don't know where all of it came from! The combination of orange, peach, and pink makes it feel bright and summer-y.
For the backing, I stumbled across this in a fabric sale. It was like this fabric was made to be the back of this quilt. The blue flowers provides a nice, calming contrast to the brightness of the front. The pops of orange and red flowers mixed in with the blue perfectly compliments the front.

Similar to Snowflakes in July, this pattern is a suitable for a confident beginner. A tutorial on the No Waste Flying Geese method can be found here, and be on the lookout for an in depth tutorial on the Magic 8 HST method coming soon. The most complex part of this pattern is paying attention to the direction of the HSTs, ;)

As I stated earlier, I originally sketched this out as a concept for a custom quilt. When the client chose a different option, I still fleshed this out to see what it could turn into.
Compared to the drawn-out process for Snowflakes in July, this came together really quickly. It's been fun to share the process in real time as I've put it together.
I made the large crib size with 12" finished blocks.


My fabulous tester, Joanne (@turtlequilterjo) made the throw size with 16" blocks. I love how she used a blue background for hers!

Click Here to see the Flying Geese tutorial.
Click here to download the No Waste Flying Geese Reference Sheet.
Be sure to tag me (@runningstitchquilts) or use the hashtags (#summergardenquilt or #rsqpatterns) so I can see what you make! :)
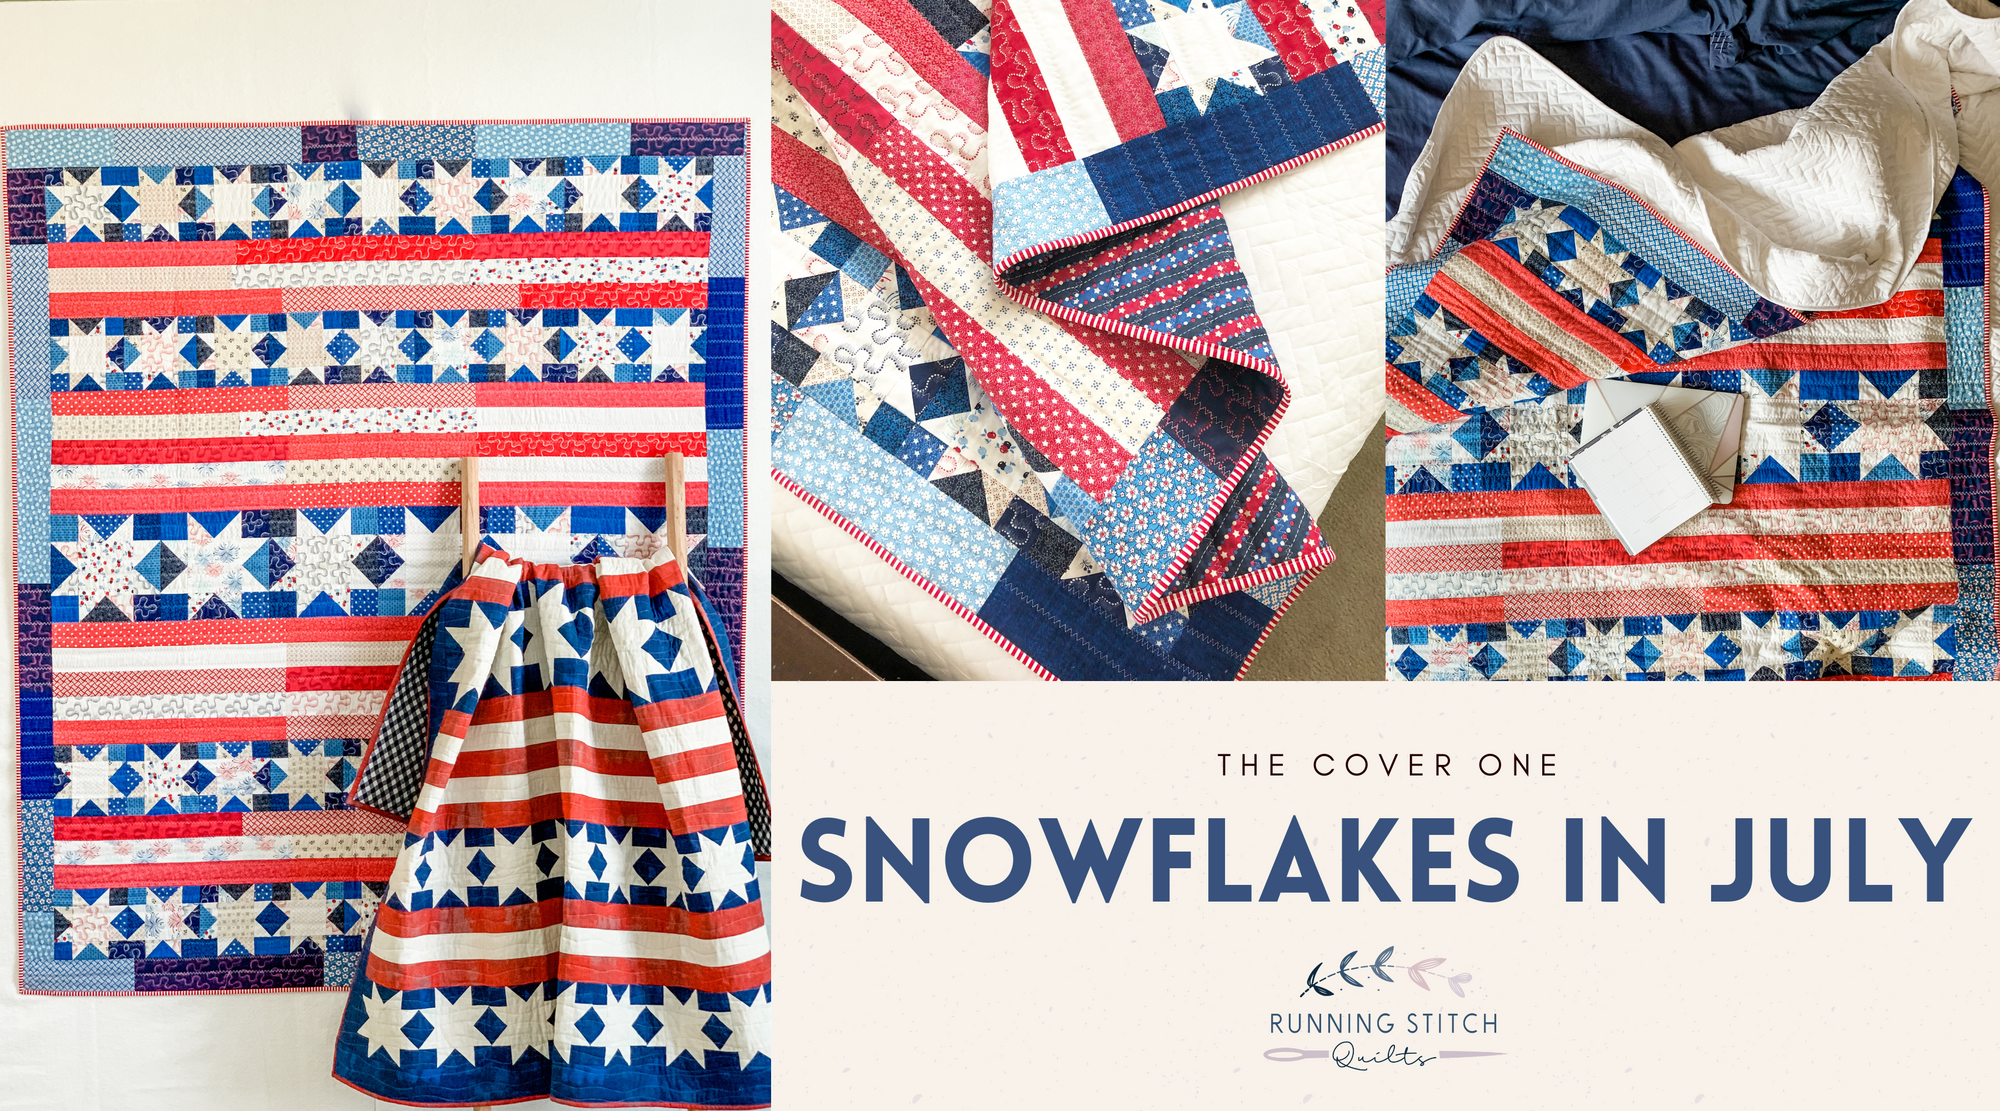
I am so excited to introduce you to my newest quilt pattern, Snowflakes in July. I started sketching this out in January, and putting it together and writing the pattern in February. (Side note - how is it already the end of May?!) Sharing this quilt with the world has been a long time coming, that's for sure.

It's a large throw size that finishes at 66"x71". Perfect for cuddling under on the couch while watching a movie, and spreading out on the ground for a picnic while watching fireworks.
My version is made from Moda Grunge fabric in Red, Regatta Blue, and Essence Ivory. I love the texture and depth the Grunge line gives while still just using a solid fabric. The pattern includes fabric requirements and cutting instructions for both yardage (to make a solid version like the one pictured) and fat quarters (to make a scrappy version that I think will look really fun)!
For the backing fabric, I chose Vintage Picnic in Navy Gingham by Bonnie and Camille. I'm a sucker for a good gingham fabric, and I think it goes nicely with my "picnic under the fireworks" feeling I had when designing this quilt.
I quilted organic wavy lines going horizontally across the quilt. I didn't measure, but I aimed to keep them and inch(ish) apart. It's gives the quilt a lovely drape while still adding some texture and interest to the surface.
This quilt pattern is suitable for a beginner quilter, but I'll take that a step further and say it would be better for a confident beginner. While it is not particularly complex pattern, some of the pieces are small and can be more a challenge to work with. But, if you are on the fence, I would say GO FOR IT! That many flying geese will be a good skill builder either way! I've written a more in depth tutorial on the Flying Geese method I use in this pattern. There is also a free PDF handout you can print off and refer to as needed. You can find all that here.

Sometimes, I have a vision for a quilt and when I try to put it on paper it just doesn't work. It takes ten versions before I find the one that works. This one, however, I saw clearly in my head before I started and when I put it on paper and did the math, it came together perfectly. If only it was that easy every time!
My husband was sitting next to me on the couch when I finished the first digital sketch. I showed it to him and asked what he would name the pattern. He said it reminded him of snowflakes. Perhaps he had snowflakes on the brain since it was January at the time. Haha. It sort of evolved into Snowflakes in July from there.

Now that all that is out of the way, I'm leaving you with lots of fun pictures. If you want to make your own Snowflakes in July, you can grab the pattern HERE!


Click Here to go the the Flying Geese tutorial.
Click Here to download the No Waste Flying Geese Reference Sheet.


