HEADS UP - All physical product shipping is on hold until mid-June!

Last year, I cleaned out and got rid of most of my fabric stash. (Read about that here).
I didn't touch my scraps though.
I can't bring myself to get rid of them because someday I'll make a postage stamp quilt or a string quilt or a scrappy something! (Maybe I'll design a quilt meant to use scraps...hmm...) In the back of my mind, I think I'll use the 'leader/ender' method to work on a scrap quilt in the background of my other projects. I just haven't found that perfect project that has made me want to start.
But, the beauty of my scrap storage method, is that when I find that perfect project my scraps will be ready to go with (hopefully) minimal prep.
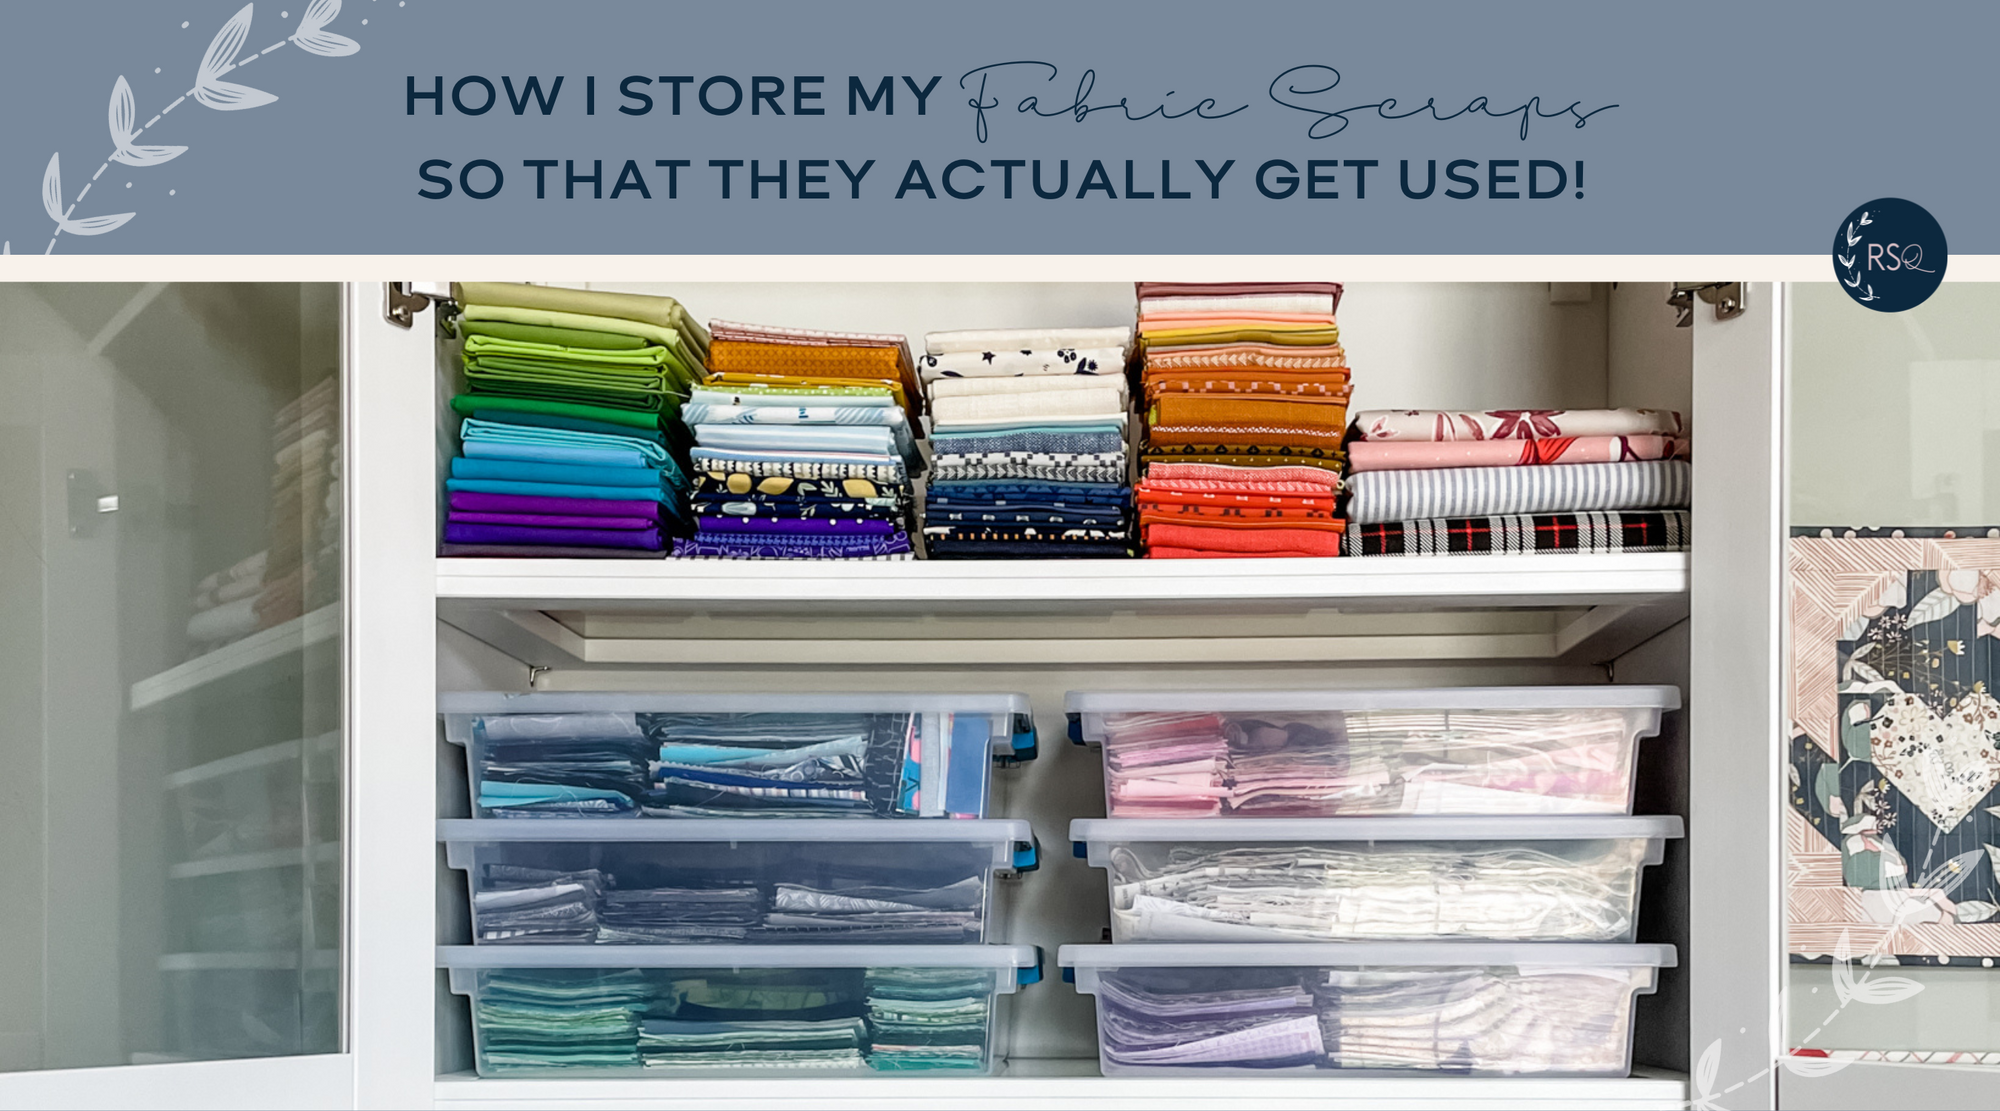
So, for right now, they are safely tucked away on my shelf until the inspiration for a scrappy quilt strikes. I'm pretty proud of my system so I thought I'd take you through how I sort and store my scraps.

I have a small bin for each color group: neutrals, red/oranges/yellows, greens, blues, purples, and Kona Snow.
The fabric in these bins is cut into commonly used sizes (squares: 2.5", 3.5", 5", and 10" + strips: 1.5" and 2.5"). I wish I could remember where I saw the suggestion to cut scraps into usable sizes, but that was several years ago, and I don't know where I saw the idea. I know Bonnie Hunter teaches the Scrap User's Method, and come to think of it, this may be where I first saw the idea all those years ago.
If you wanted to implement something similar, consider what sizes you use most often in your quilts. Personally, I chose 5" and 2.5" because there are tons of patterns out there for charm packs and jelly rolls. I chose 1.5" for the potential string quilt, and 2.5" and 3.5" because those are pretty common sizes that I use when I make quilts.
I used to cut my scraps into these units before starting the next project. I wish I could say I still had that kind of discipline! There is currently a huge pile of scraps waiting to be cut and sorted. Oops. I really should set aside a day to knock out the whole pile so it is no longer taking up space on my To Do list. If you want to come help, I'll provide pizza and wine. Let me know.
The only exception to this method is the Kona Snow bin. Those scraps get tossed in at whatever size is left over. This is the white background fabric I use in all my quilts so WOF cuts and larger cuts are nice to have on hand.

Anything larger than a fat eighth, gets folded and stacked on the shelf. In an effort to keep my fabric stash to a minimum, I am currently only keeping solids, and the occasional stripes. Anything else gets listed on my destash account for someone else to enjoy. My goal is for my entire fabric stash (scraps included) to fit on this IKEA bookshelf. If it starts to overflow, I know I need to do a better job of USING what I have before buying more.

Lastly, I have two large ziplock bags. One contains orphan blocks and the other contains leftover HSTs. I will eventually work the HSTs into a scrappy quilt. The orphan blocks would be good for small projects like zipper pouches, pillows, or FMQ practice.
I should also mention my batting scraps! After seeing how large this pile is getting, I should probably start using my batting scraps in my quilts this year. I have the size pinned to the top of the folded batting scrap. That way I can easily grab the piece (or pieces if I will need to attach them together) I need.

Do you have a scrap storage system, and what are you planning on doing with your scraps? If you have a scrappy project you are working on, let me know! I need inspiration.

If you are looking for ways to use up your scraps, look no further! My FREE Scrappy Valley Quilt pattern is perfect for this! You can download the pattern here!
Free Scrappy Valley Quilt Pattern